- Home
- Knowledge hub
Step-by-step: How to get data from a PLC using IIoT?
6 min. read
Shelly Boom
But how to get data from a PLC? This 7-step guide will take you through the process of PLC data extraction and collection using the IXON Cloud IIoT solution.
 How to get data from your PLC with IXON Cloud
 A PLC can generate huge amounts of data to control the machine and is a source of information for solving faults and carrying out optimisations. However, PLCs are limited in data storage and usually only accessible for the engineers.
By getting data from your PLC and storing it safely in the cloud you can collect unlimited data for analysis and view real-time data streams to gain more insights in your production process and machine operations. This helps to improve machine operations in the short and long term.
There are many ways to extract data from a PLC, which makes it difficult to say where to start. Every PLC supports other protocols and sometimes you need to program or link multiple tools. The IXON Cloud is a universal solution suitable for PLCs as well as robot controllers and sensors. It supports several industrial protocols which makes it very scalable for your machinery.
You can set up data logging without writing a single line of code. Once your data sources and variables are defined, you can use the data to create dashboards and set alarms to make the data available and actionable for your service team or customers. The steps below show how it’s done.
 Instant access to PLC data from heat pump and solar panels at IXON HQ
The IXON headquarters have recently been equipped with a new heating and cooling system (Aermec ANL292) as well as 600 solar panels (SMA STP50-40). All extracted data from the solar panels and heat pump’s PLC are gathered via Modbus and are now available in IXON Cloud for monitoring, troubleshooting and analysis. While we walk you through the 7 steps of how to extract data from your PLC and send it to the cloud, we will use the above mentioned situation as a reference.
First of all, it’s important to define which PLC data you want to collect and store. In your data strategy consider which PLC variables and sensor data you want to monitor (or have in place). If needed, create additional PLC variables like calculated values or counters to support your data needs. For example, you can choose to extract data about machine vibrations, kWh consumption of an energy source or the number of actions of your robot.
In our case, we chose to collect data such as delivery pressure, outside temperature, heating setpoint and kWh yield per solar panel group.
Once your data strategy is in place, the next step is to make sure that everything is set up correctly for your data extraction. There are a number of requirements that must be fulfilled before you can start with data collection for PLC machines.

In the case of the heat pump, no connection via ethernet was available for the Aermac. To enable data extraction from the PLC, we used a RS485 to ethernet converter (ADFWeb HD67507-A1). The heat pump ModBus communication is converted from the serial RS-485 connection to a TCP connection. To check if the PLC data could be retrieved we used ModBus tools to check the connection of our PC.
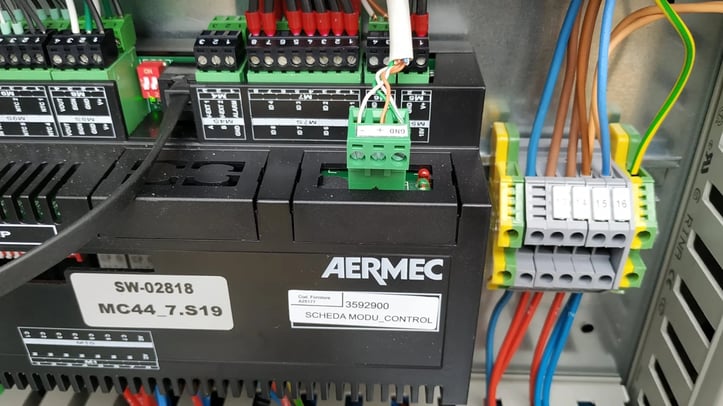 The Aermec attached to the RS485 ethernet converter
Now it’s time to configure the IXrouter or SecureEdge gateway, which is easily done in three simple steps from your IXON Cloud account. When the internet connection is set up, the edge gateway is added to your account and you can connect it to your PLC which can then be securely accessed from remote in the IXON Cloud.
Once a VPN connection is established to the IXrouter or SecureEdge gateway via IXON Cloud, you can test if you can access the PLC via ping or your PLC software tool like the TIA portal. If everything works, your PLC is accessible for data configuration.
In our case, the SMA’s for the solar panels are directly connected via an ethernet cable to the IXrouter3 or SecureEdge ethernet model. We’ve used two IXrouters to connect seven SMA’s. For the heat pump we’ve connected the RS485 converter in the cabinet to a Wi-Fi model IXrouter3 with 3m Wi-Fi cable. This allows the system to connect stable over Wi-Fi from outside the building.
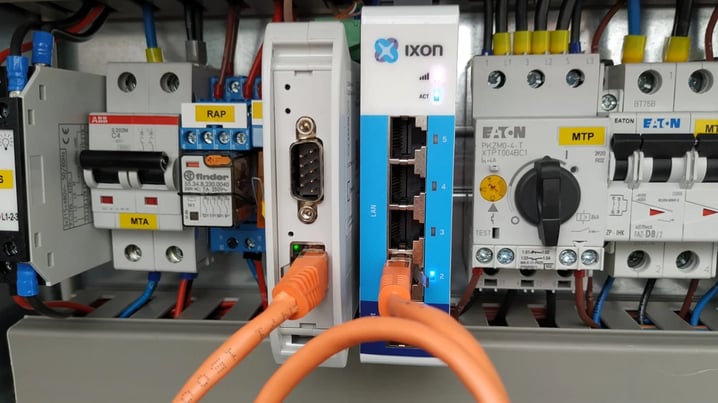 IXrouter in the electrical cabinet connected to the RS485 to ethernet converter
The next step is to configure which PLC data protocol you would like to use to gather data. Open the Fleet manager on IXON Cloud and add a data source for each device as a new service to the IXrouter or SecureEdge configuration.
Once your data service is added, you can add a variabele and the address where it is located (e.g. integers, floats, booleans). The edge gateway ‘listens’ to the port for the defined variable once the configuration is pushed to the gateway. Once a variable is added you can run a test in IXON Cloud to check if the data can be retrieved. In the example below we’ve added variables like the active power, status and daily yield.
The process is similar if you need to configure additional data sources and protocols. This makes it easy to learn.
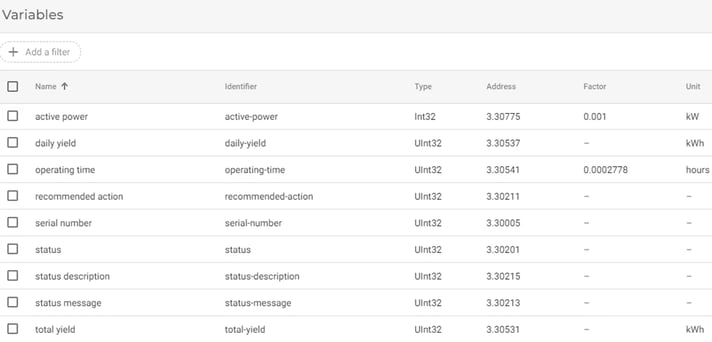 Configuring the PLC variables in IXON Cloud to collect data from solar panels
During step 1 you defined which data you want to collect and in step 4 you’ve added and tested your first variabele. You can now add all data variables and test them. Next step is to set tags that ensure which variable is going to be logged when and how often. You can choose a time interval, on change or set triggers when to log the variable’s value.
We wanted to extract solar panel data about the yields and heat pump data about the consumption. For troubleshooting we’ve added additional variables with the current error states. Most data is logged on intervals every minute (60 data points per hour).
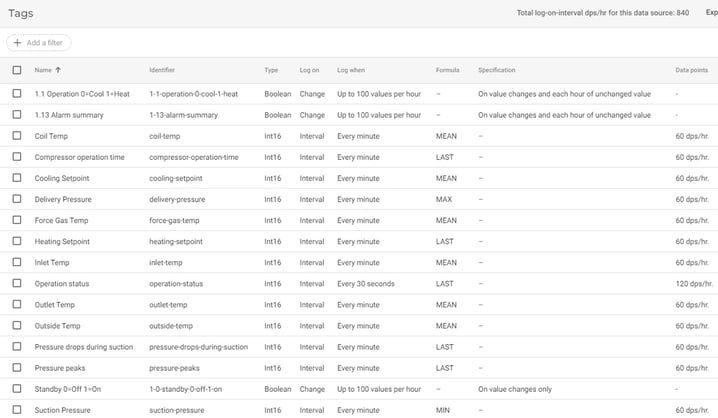 Configuration of data logging tags of heat pump in IXON Cloud
Your data will now safely be stored in the IXON Cloud. The next step is to design dashboards according to your needs in the IXON Studio. Create pages to display data in real-time or historical views by using widgets that are relevant for your type of data. With the Drag & Drop function you can choose from a list of over 20 different widgets. Additionally you can create your own widgets with VueJs.
We’ve created several dashboard pages to visualise the PLC data. For the heat pump status page we chose to display the historical and live data in a combined dashboard so we can see if the chiller is on or off and if there are any errors or remarkable values. We added gauges, status bars, barcharts and single values.
 Dashboard of collected PLC data from heat pump with live and historical data, created in IXON Cloud

With your data available in IXON Cloud, you can also set alarms and notifications to proactively inform service engineers or operations about a potential machine or part issue, like when a value exceeds a maximum value.

We have set a medium priority alarm for when the heat pump is turned off. We will receive a notification on our smartphone and via email when the alarm is triggered so we can reset the operation.
Now you know how to get data from your PLC, it is time for you to give it a go! The IXON Cloud all-in-one IIoT solution eases this process, requiring less maintenance in the long term.
Discover the ease of our no-codeplatform. Easily and securely extract data from your PLCs and turn them into information with customisable dashboards for your service team and customers.
Try it yourself in our free virtual product tour. If you have questions about your PLC data logging use case, our specialists are ready to help. Please get in touch with them here.